


1. Buy a domain name and hosting
As we mentioned, WordPress.org’s software is free to download. But unless you own your own computer server, you’re still going to need to pay someone to host your website and make it available to anyone in the world, 24 hours a day.You also need to buy a domain name: the web address that allows people to access your site. (For example, the domain name of the site you’re looking at now is creativebloq.com.) Most hosting companies will sell you a package that includes both hosting and a domain name, which makes things a lot simpler.
If you don’t know where to start in choosing a hosting company, then check out the best web hosting services. For the purposes of this article, though, we’ve randomly chosen Hostgator to create our dummy website.
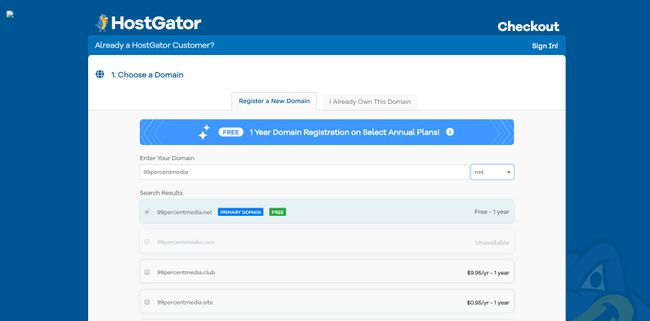
Doing that takes us to the screen below, where we're asked to choose a domain name.
You’re then asked to enter your personal and payment details, which is all pretty self-explanatory. In section 4 of the form, there are some extra services the company will try to sell you. These are all potentially useful, but for beginners we’d recommend unticking all these boxes to keep the overall cost down.
In section 5, you get the chance to use a discount code to get money off. Don't pass this up. Do a quick Google search to see if you can find a valid code. Again, it’s worth taking a few minutes over this.
Once you’ve reviewed everything and are happy with your purchase, click the box saying you agree with the Terms and Conditions, and proceed to checkout.
2. Install WordPress
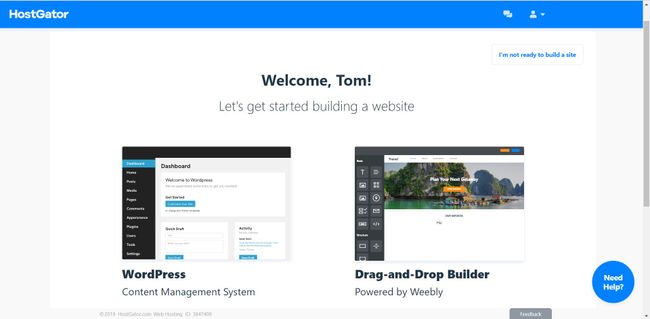
After checking out, we get this screen (above) telling us that HostGator is setting up our account. After a couple of minutes, it’s replaced by this screen.Clicking on the WordPress option brings us to the screen below.
It’s not super-obvious, but from here, you need to click on Install WordPress under Control Panel. This brings you to the screen below, where you need to enter some details. (You'll prob want to ignore the bit at the bottom about ‘Let a pro do it for you’.)
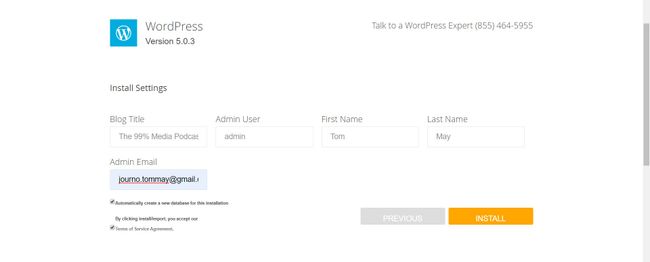
Also add your first and last name, and your email address, tick Automatically create a new database, agree to the terms of service, and click the Install button.
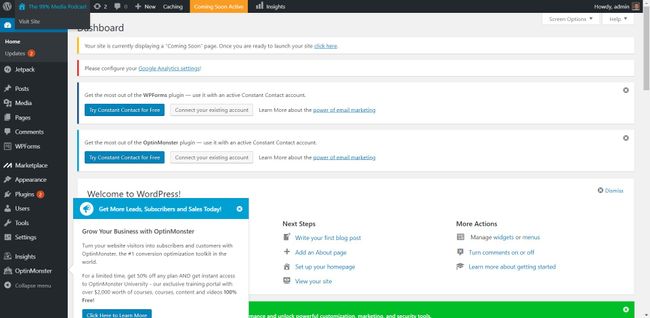
Yay! You’re now finally at your WordPress dashboard, where you can start building your site. Note: in future, you can come here at any time by entering your site’s URL and ‘/wp-admin’. In our case, that's http://99percentmedia.net/wp-admin/.
3. Start building your site
Now the real fun/work begins! But before we get into the juicy stuff, there’s a bit of boring admin.At the moment, your site’s internal page URLs are going to be long and confusing. So you need to tweak a few setting to make them shorter and simpler.

Okay, so want to see what your website looks like at the moment? Then hover over its name at the top of the page and click on Visit site. Right now, it will look something like this:

The most common way to do this is by using themes, which are basically templates with dummy images and text which you can then customise for your own purposes.
4. Choose a theme
WordPress.org comes with a few preloaded themes, or you can find both free and paid third-party themes online. Check out, for instance, our lists of the best free WordPress themes and top-quality WordPress portfolio themes.Once you find a theme you like online, then first you need to download it as a zip file. Then in your dashboard, go to Appearance and click on Themes > Add New > Upload Theme.
Navigate to the zip file on your computer, then click on Install, then Activate.
5. Start customising
As you can see above, we’ve opted to use WordPress’s own Twenty Seventeen theme. There’s a lot that we now need to do to personalise this, but most obviously, the default picture isn’t really relevant to our topic. So let’s change it.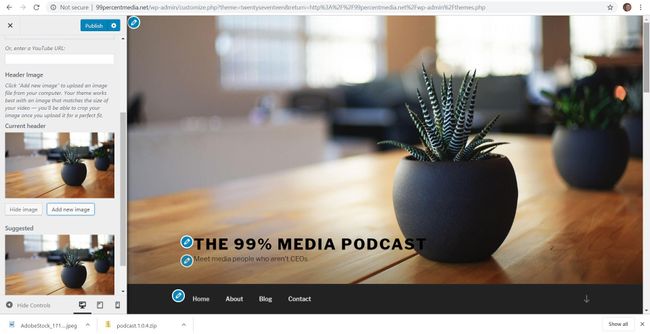
Instantly, this is starting to look less like a bland template and more like a bespoke website. Obviously this is just the start of building out our website within the Dashboard. We'll need to swap out the dummy text and the other images with our own. We'll also need to change its structure, its colour scheme, add things like footers, icons, and social media links.
But every journey starts with a single step, and we’re now on our way. To help you through the next steps, check out WordPress’s own lessons, as well as our list of top WordPress tutorials. Best of luck!
Alternatives to WordPress
WordPress is great, but it's not the simplest way to create a website. So if you want an easy option, or if you need to get a quick website live today or tomorrow, then, we’d recommend spending some extra cash and opting for one of the paid-for website building platforms, such as Wix, Squarespace or Shopify.Each of these has different pros and cons, check out our selection of the best website builders so you can see exactly what the various services have to offer and which one is likely to be the best fit for you.


0 comments: